Hardwood floors bring warmth and charm to a home, but over time, they can suffer from scratches, dents, or water damage. While small scuffs are easy to fix, bigger problems like broken boards or large gaps may require patching. Many homeowners wonder—how hard is it to patch hardwood floors? The answer depends on the size of the damage, your skill level, and the tools you have on hand.
In this guide, we’ll explain the process of patching hardwood floors, when you can do it yourself, and when it’s better to hire a professional.
Understanding Hardwood Floor Damage
Before patching, it’s important to know the type of damage you’re dealing with. Minor surface scratches can often be buffed out or filled with wood filler, but deeper damage—such as water stains, warped boards, or missing planks—will likely need a patch.
Patching involves removing the damaged section and replacing it with new wood that matches the existing floor in both type and finish. The challenge lies in ensuring the patch blends in perfectly with the surrounding boards so it doesn’t stand out.
DIY vs Professional Patching
If you have basic carpentry skills, patching a small section can be a manageable DIY project. You’ll need tools like a circular saw, chisel, hammer, pry bar, and measuring tape. You’ll also need to source matching wood, which can be tricky if your floor is older and the same material is no longer available.
For more complex repairs especially when dealing with large areas, tongue-and-groove boards, or unique wood species it’s best to get professional help. Hiring an expert for Hardwood Floor Repair in Richmond VA ensures the work is done safely and seamlessly, saving you time and frustration.
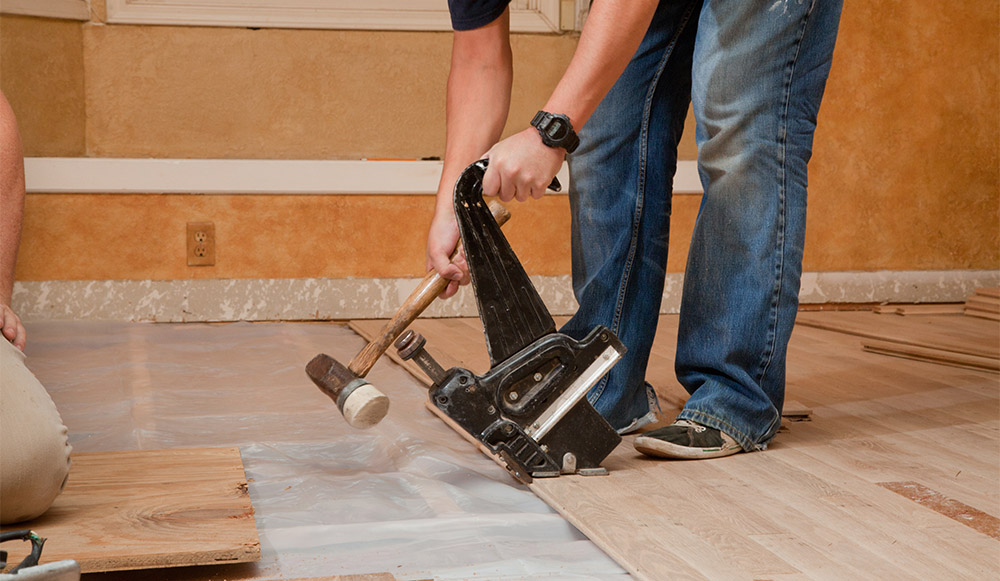
Steps to Patch Hardwood Floors
- Identify the damaged area – Mark the section you want to remove, making sure you only cut the damaged board and not the surrounding ones.
- Cut out the damaged board – Use a circular saw to cut along the board’s length, stopping short of the edges to avoid damaging adjacent planks.
- Remove nails or staples – Pull out any fasteners holding the board in place with a pry bar or hammer.
- Prepare the replacement board – Cut the new board to size, trimming the tongue or groove if necessary to fit it in place.
- Install the new piece – Apply wood glue to the edges and secure the board with finishing nails.
- Sand and finish – Lightly sand the patch and apply matching stain and finish to blend with the existing floor.
Common Challenges in Patching
While the process might sound straightforward, there are a few hurdles that make patching hardwood floors harder than it seems:
- Matching the wood grain and color – Even the same wood species can vary in tone and pattern, making it difficult to get an exact match.
- Dealing with aged floors – Older floors may have darkened with age or wear, so a fresh board can stand out unless carefully stained.
- Keeping the repair invisible – Any uneven edges or gaps will be noticeable, so precise cutting and fitting are essential.
- Working with tongue-and-groove joints – Getting new boards to fit tightly into the existing floor can be tricky without damaging surrounding boards.
When to Call a Professional
If the damage covers multiple boards or is located in a high-traffic area, a professional repair is worth the investment. Experts can source matching wood, handle tricky installations, and refinish the area so it blends seamlessly.
Another reason to hire a pro is if you suspect subfloor damage. In such cases, the problem goes beyond surface repair and may require removing multiple boards to inspect and fix the underlying structure.
Why Expert Work Matters
A poorly done patch can not only look bad but also reduce your floor’s durability. Professional repairs ensure the patch is flush, secure, and finished to match the original flooring. In many cases, the cost of fixing a bad DIY patch ends up being higher than hiring a pro from the start.
One company known for quality craftsmanship in this area is American Floors. They’ve built a strong reputation for delivering precise, durable, and visually seamless hardwood repairs. Homeowners who’ve worked with them often mention how their work blends so well that the repair becomes nearly impossible to spot.
Maintenance After Patching
Once your hardwood floor is patched, proper maintenance is key to keeping it looking good for years:
- Clean regularly with a soft-bristle broom or vacuum designed for hardwood.
- Wipe up spills immediately to prevent water damage.
- Use felt pads under furniture legs to avoid scratches.
- Consider periodic refinishing to maintain a consistent look.
Cost of Patching Hardwood Floors
The price depends on the size of the patch, the wood type, and whether you do it yourself or hire a pro. On average, a small DIY patch might cost under $100 for materials, while a professional repair can range from $200 to $600 for a single board replacement. More extensive repairs involving multiple boards or refinishing can cost significantly more.
For large or highly visible areas, investing in professional Hardwood Floor Repair in Richmond VA often ensures a better, longer-lasting result, and can protect the overall value of your flooring.
Conclusion
Patching hardwood floors isn’t the hardest home project, but it’s far from the easiest. For small, isolated damage, a careful DIY approach can work well if you have the tools and patience. However, when dealing with larger areas, matching wood, or maintaining a seamless finish, professional help is often the smarter choice.
Done right, a patch can restore your floor’s beauty and durability, extending its life for many more years.


I truly appreciate your technique of writing a blog. I added it to my bookmark site list and will