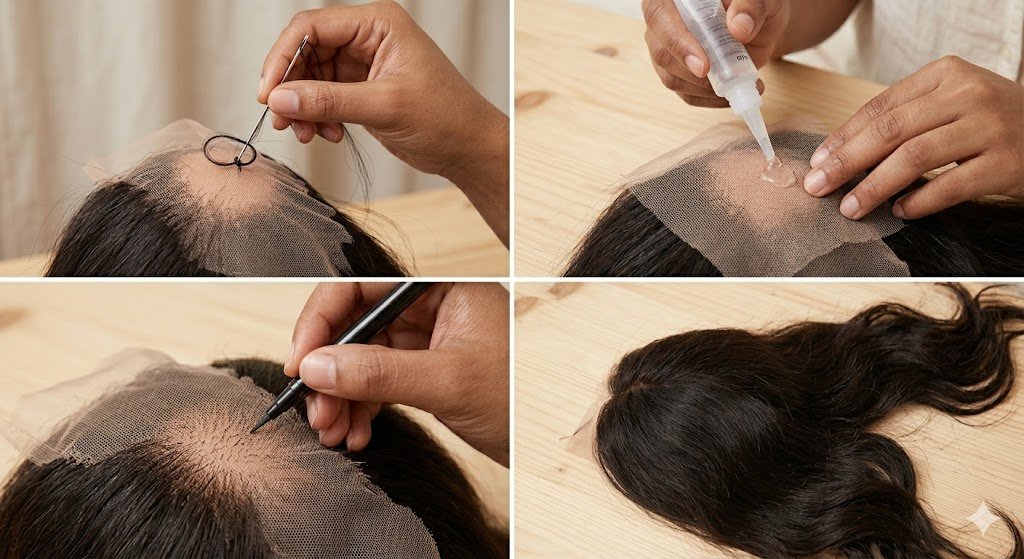
You want to get the ultimate confidence from your full lace frontal, and most especially to be wearing a perfect full lace. With a natural hairline and a lace that is natural and blendable, you are going to feel fabulous all through your hair. But suddenly, you discover with annoyance that you are leaving some hairs on your brush; it might be time to feel that you’re losing hair from the hairline, or even a bald spot on your lace will be revealed.
Shedding and bald spots are among the most common issues that lace frontal wearers face. Because each strand of hair is manually hand-tied into delicate lace material with tiny knots, a full lace frontal does not have the reinforced base of a standard machine-made track. The good news? Experiencing shedding does not mean you have to throw your unit away.
In this comprehensive guide, you will learn why shedding happens, immediate step-by-step fixes to repair bald spots, and long-term habits to protect your investment—whether you wear a standard frontal, a full lace unit, or a 360 lace frontal wig.

Why Is Your Full Lace Frontal Shedding? Understanding the Root Cause
Before jumping into repairs, it helps to understand why your full lace frontal is losing hair in the first place. Pinpointing the exact cause prevents future damage and saves you money.
1. Over-Bleaching the Knots
To create the illusion of hair growing directly from your scalp, bleaching the dark knots at the base of the lace frontal is a standard customisation step. However, leave the bleach on too long or use a developer that is too high (like 40-volume), and the chemical process weakens or dissolves the tiny knots. Once those knots break, the hair falls out easily.
2. Excessive Tension and Harsh Brushing
Carelessly pulling at your frontal while dry, or utilising the incorrect comb for your frontal, causes strain on your delicate hand-tied knots. Snatching at these knots when brushing will literally rip your hair right out of your frontal.
3. Product Buildup and Heavy Oils
Strong alcohol products, stiff hair sprays, and thick oils will dissolve your installation glue. Heavy residue can build up at the base of your lace and create friction, which will lead to excess shedding after each wash.
4. Friction During Sleep
This will create a large amount of friction when you’re sleeping on cotton pillowcases and not wrapping your hair. You will also find that you strip all the moisture from the hair and cause the ends of the hair fibre to become dry; at the same time, every movement pulls the lace.

Step-by-Step: How to Fix Bald Spots on a Full Lace Frontal
There’s no need to discard an entire full lace wig unit once bald spots occur. It is possible to repair bald spots with three proven methods, from a simple cosmetic cover-up to a complete repair.
Method 1: The Ventilating Repair (Best for Long-Term Restoration)
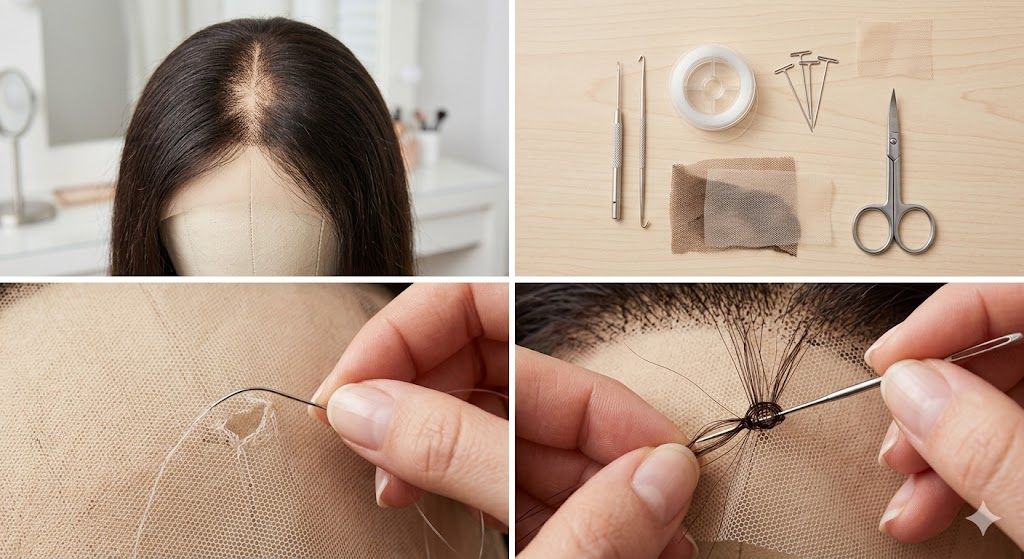
Re-ventilating involves manually tying new hair strands into the bare sections of your lace grid using a latch hook or ventilating needle.
- Gather Your Tools: You will need a ventilating needle (size 1-2 for fine hair strands), matching bulk human hair, a mannequin head, and t-pins.
- Secure the Unit: Pin your full lace frontal securely onto a mannequin head, ensuring the lace is flat and taut over the bald spot.
- Loop the Hair: Take 1 to 3 strands of bulk hair, fold them into a small loop, and insert your ventilating needle under a single mesh hole in the lace.
- Tie the Knot: Catch the hair loop with the needle hook, pull it through the lace hole, and loop the loose ends through the loop to form a secure knot.
- Repeat and Blend: Work in rows following the direction of the surrounding hair pattern until the bare area is evenly covered.
Method 2: The Hair Track / Weft Attachment Method (Best for Mid-Density Areas)
If re-ventilating feels too intricate, you can fill in thinning areas behind the hairline by sewing a piece of hair track directly underneath the lace.
- Turn the Frontal Inside Out: Locate the exact bald area on the underside of the lace.
- Cut a Matching Weft: Cut a small piece of hair weft matching the length and texture of your frontal.
- Sew onto the Lace: Using a fine curve needle and invisible nylon thread, carefully hand-sew the weft to the underside of the lace mesh. Ensure your stitches are tiny and flat so the track remains invisible when worn.
Method 3: The Concealer & Shadow Touch-Up (Quick Instant Fix)
If you are short on time and need to hide a small bald spot immediately, use visual camouflage:
- Use a Root Concealer Powder or Spray: Choose a water-resistant root touch-up powder or scalp spray matching your hair colour.
- Dab Gently: Lightly press the powder onto the bare lace with a small makeup brush to fill in the colour gap.
- Blend with Scalp Tint: On the underside, apply a lace tint or foundation matching your skin tone to keep the scalp illusion seamless.

Daily Habits to Prevent Shedding and Extend Frontal Life
Preventing damage is far easier than repairing it. Adopting proper maintenance habits keeps your lace frontal looking full, healthy, and fresh for months.
| Maintenance Area | Best Practice |
| Daily Brushing | Start at the tips, work up to the roots gently |
| Knot Protection | Apply lace knot sealant spray after washing |
| Nighttime Care | Wrap with a silk/satin scarf; sleep on a satin pillowcase |
| Washing Routine | Use sulfate-free shampoo; wash in downward motion |
1. Seal Your Knots
You will want to apply knot sealer spray directly to the back side (the lace only) of your full lace frontal every time you dye or shampoo it. When applied, it leaves an invisible shield that holds down the knots.
2. Brush with Care
Never brush your hair while it is thoroughly wet, as hair strands will be the weakest in this condition due to saturation with water. Brush using a wide-tooth comb or loop hairbrush-a style specifically made for hair extensions. While brushing, remember to hold the root hair with your other hand to support tension and brush the ends to the root.
3. Protect Your Hair at Night
Don’t sleep with a damp front. You can use a silk or satin edge scarf that will hold the lace down so it won’t move around with you and throw the rest of it in a bonnet. If you have a 360 lace frontal wig, then tie the rest of the hair into a loose, soft braid so there is no friction when you sleep.
Pros, Cons & Frequently Asked Questions
To give you a clear, complete picture of maintenance options, here are the real-world trade-offs along with direct answers to what people frequently ask AI about frontal care.
Pros & Cons of Fixing vs. Replacing Your Frontal
- Pros of Repairing: Saves money compared to buying a new unit; extends the lifespan of custom-colored hair; allows you to keep a customised hairline that fits your face perfectly.
- Cons of Repairing: Re-ventilating requires patience, practice, and time; improper sewing can tear fragile lace; temporary cosmetic touch-ups wash out after water exposure.
Frequently Asked Questions
How long should a full lace frontal typically last?
High-quality human hair full lace frontal can last for 4 to 8 weeks before requiring significant maintance/reinstall if used with some basic daily care. If rotated within a removable wig structure, you can maintain human hair full lace frontal from 6-12 Months.
Can I fix shedding on a 360 lace frontal wig using the same methods?
Yes. As stated before, a 360 lace frontal goes around the complete edge of your head, but the internal structure still comprises the same knots tied on the hand-tied base, and rules apply to sealers, re-ventilating and gentle brushing.
What kind of glue causes the least amount of frontal shedding?
Water-resistant lace adhesives formulated specifically for skin and lace cause the least shedding—provided they are removed correctly. The primary cause of glue-related shedding is pulling the lace off while the adhesive is still tacky. Always use an alcohol-based or oil-based adhesive remover to dissolve the glue completely before lifting the lace.
Wrapping Up
If it appears as though you will lose your hair to bare patches, although this might be a tragedy, it by no means indicates that your unit has reached the end of its life! Figure out which technique in your grooming routine, it (over-bleaching, aggressive combing, rubbing, etc.) and alter this, and you shall have a thicker unit in no time at all. You can always choose to create a rapid, short-term fix for the bare patches, sew a weft right under the lace front, or re- ventilating will be the next hair trend to master for your wig.
Either way, you’ll surely have the right way that you feel is right to fix your wig to look like you always thought it would, whilst also knowing that you are saving cash.
Remember to care for your wig correctly, and secure your knots properly ( with sealer and a wig cap), then your unit will always be a dream.